
Table of Contents
- Why Outdoor Aesthetics Start With a Unified Plan
- Professional-Grade Finishes That Hold Up in Coastal Conditions
- Outdoor Kitchen Finishes: Choosing Surfaces That Perform
- Outdoor Lighting Design: Layering Light for Depth and Safety
- Building a Backyard Lighting Plan That Works After Dark
- Fire and Water Features as Focal Points
- Conclusion: Bringing Finishes and Lighting Together
- Frequently Asked Questions
Last Updated: October 7, 2026
Why Outdoor Aesthetics Start With a Unified Plan
Outdoor aesthetics is the practice of coordinating materials, finishes, and lighting so a yard reads as one designed space instead of a collection of purchases. At Bellafina Outdoors, we see it constantly: two backyards with similar budgets, one intentional and one assembled. The gap is almost never money, it is planning.
The biggest mistake we see is buying in the wrong order: a fire bowl in March, a patio poured in May, lighting hunted down in July. By then the finishes are locked in and lighting has to work around them.
A unified plan sets three things before anything is ordered:
- The material palette, meaning stone, metal, and wood tones
- The fixture family, so metals match across the yard
- The lighting layers, mapped to how you actually use the space
Get those right and every later decision gets easier.
The Cost of Mismatched Materials and Fixtures
Mismatched finishes are the most common and most expensive mistake in outdoor projects.
Coastal Orange County makes this worse. Salt air, marine layer moisture, and strong afternoon sun age cheap finishes fast. A fixture that looks fine inland can pit or chalk within a season near the coast.
The fix is boring but effective: pick one metal tone and one stone family, then hold the line. Filter every option a contractor or designer brings against that palette first.
Professional-Grade Finishes That Hold Up in Coastal Conditions
Coastal outdoor materials need to survive salt, moisture, and UV, which rules out a lot of what looks good in a showroom photo. The table below compares the main options; the notes after it explain how to choose and maintain them.
| Finish | Best For | Coastal Performance | Maintenance |
|---|---|---|---|
| Powder-coated metal | Fireplace and kitchen frames | Strong salt resistance when coating is intact | Rinse occasionally, touch up chips promptly |
| GFRC concrete | Fire and water bowls, planters | Holds shape, resists moisture well | Seal per maker guidance |
| Copper | Fire bowls, accents | Ages to a patina, handles salt air | Let it patina, or polish |
| Natural stone | Patios, walls, counters | Durable, varies by stone type | Reseal as needed |
| Porcelain tile | Kitchen counters, floors | Very low water absorption | Easy wipe-down |
How to Actually Choose Between Them
Start with exposure, not looks: a surface facing full afternoon sun and salt air ages differently than one under a covered patio. Ask three questions before you commit:
- How much direct sun and salt will this surface see? Fully exposed surfaces need strong UV and corrosion resistance; covered areas give you more latitude.
- How much maintenance are you willing to do? Copper patinas on its own. Natural stone needs periodic resealing. Powder coat needs rinsing and prompt touch-ups. Match the material to the upkeep you will actually perform.
- What is the failure mode, and how bad is it? A chipped powder coat is cosmetic and fixable; a cracked concrete bowl or delaminated counter is not. For high-visibility pieces, favor materials whose failure is gradual rather than sudden.
Powder-Coated Metal, GFRC, and Copper: What Each Does Best
That durability is why you see it on fireplace bodies. The 72" Williams Outdoor Fireplace uses a white powder-coated metal finish with low-voltage electronic ignition.

GFRC, or glass fiber reinforced concrete, mixes concrete with glass fibers for added flexural strength, letting makers cast detailed shapes that plain concrete would crack in.
Copper is the traditional choice, and it earns its place: it develops a living patina over time rather than degrading, exactly the behavior you want in salt air.
Climate, Drainage, and Long-Term Durability
Coastal Southern California is mild compared to freeze-thaw climates, but it is not easy on materials. Three local factors drive most premature failures:
- Salt air and marine layer moisture. These accelerate corrosion on unprotected metal and leave mineral deposits on stone and tile. Rinsing exposed surfaces periodically removes salt before it does damage.
- UV exposure. Strong sun fades cheap finishes and degrades some sealers faster than general guidance suggests. Reapply sealers on the exterior schedule the maker specifies, not the interior one.
- Drainage. Water that pools against a finish, at the base of a fireplace, under a planter, along a counter edge, is the most common cause of staining and premature wear. Good slope and drainage away from finishes matter as much as the finish itself.
None of this requires exotic materials, just finishes whose maintenance you will keep up with, detailed so water and salt do not sit where they shouldn't.
Outdoor Kitchen Finishes: Choosing Surfaces That Perform
Outdoor kitchen finishes fail for one reason more than any other: heat. A counter that handles a hot pan indoors may stain, crack, or discolor under a grill hood in direct sun.
Match the surface to the job:
- Countertops: porcelain tile and dense natural stone handle heat and wipe clean
- Cabinet faces: powder-coated metal resists moisture and salt
- Backs and walls: stone veneer adds texture and hides wear
- Floors: textured stone or porcelain for grip when wet
Design cohesion matters here too. If your kitchen frame is powder-coated black, your path lights and fireplace trim should echo that tone, not fight it.
For tighter yards, finish choices matter even more. A smaller footprint means every surface is visible at once, so mismatches have nowhere to hide.
Outdoor Lighting Design: Layering Light for Depth and Safety
Outdoor lighting design is the practice of layering light at different heights and intensities so a space feels deep, usable, and safe after dark. One floodlight on the back wall does none of those things.
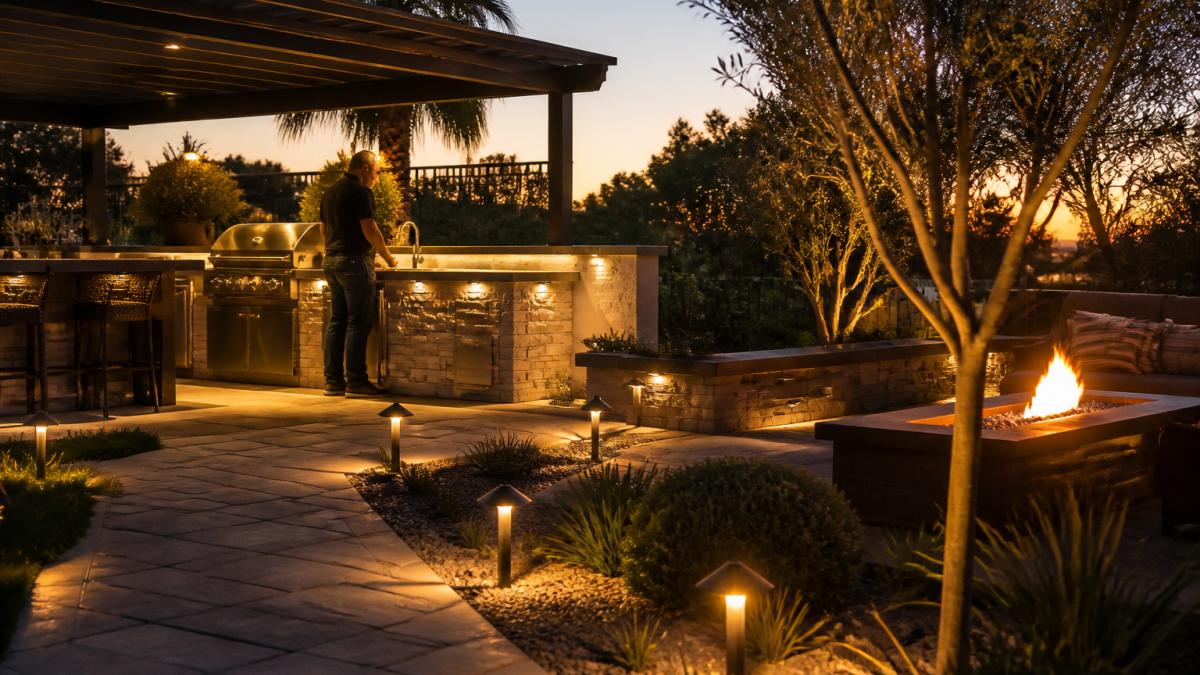
Most guides stop at "use ambient, task, and accent layers." That is true but not actionable. To specify fixtures, you need four numbers and one placement rule.
The Four Specifications That Decide Whether a Lighting Plan Works
Color temperature (Kelvin). This sets the mood more than brightness does. Warm light in the 2700K-3000K range flatters stone, wood, and copper and is the residential outdoor default.
Lumen output. Lumens measure usable light, not wattage.
Beam spread. This is the angle of light a fixture throws, and it is the spec most homeowners never see. Narrow beams (roughly 10°-20°) create tight, dramatic accents on a single object.
72" Williams Outdoor Fireplace - White - Powder Coated Metal - Low Voltage →
Glare control. Glare is light hitting the eye instead of the surface. It is the single biggest reason a professionally lit yard still feels uncomfortable.
Layering in Practice
Ambient lighting is the base layer, washing a space in soft light so you can move around without squinting.
Task lighting is for doing things: the grill station, the prep counter, the steps. This is the layer people forget and the one they miss most after dark.
Accent lighting is the drama. It highlights a fire bowl, a specimen tree, or a stone wall. Use it sparingly, one or two focal points per view, and let the contrast do the work.
Safety and Light Pollution: The Part Most Plans Skip
Lighting that looks great can still bother neighbors and wildlife. Two habits prevent most complaints:
- Shield upward light. Aim fixtures down or at the surface they are meant to light. Unshielded uplights throw light into the sky and into neighboring yards.
- Put exterior lights on a timer or photocell. Lights that stay on all night waste energy and annoy neighbors. Zoned controls let you keep safety lighting on while dimming decorative layers.
Low-voltage residential systems are the standard for a reason: they run on a transformer, use less power, and are safer to work around than line voltage. That said, low-voltage does not mean "no rules." Transformer sizing, voltage drop over long runs, and dry connections all affect performance. If you are not comfortable with electrical work, hire a licensed electrician.
Solar fixtures avoid wiring entirely, but output depends on sun exposure and battery capacity, so they work best as accents or in areas that get full sun rather than as primary task light.
Building a Backyard Lighting Plan That Works After Dark
A backyard lighting plan is a simple map of what gets lit, with what fixture, and why. Build it on paper before you buy anything.
Here is the sequence we walk clients through:
- Walk the yard at night. Note dark spots, trip hazards, and what you want to see.
- Mark the focal points. Fire feature, kitchen, a favorite tree.
- Assign a layer to each. Ambient, task, or accent.
- Choose fixtures by family. Match metal tone across the whole plan.
- Set the controls. Group lights into zones you can dim or switch separately.
- Plan the wiring early. Low-voltage runs are far easier before hardscape goes in.
That last point trips up more projects than any other. Trenching for low-voltage lighting after a patio is poured means cutting or routing around it, which adds cost and compromises the layout.
Low-voltage lighting is the standard for residential yards.
Fire and Water Features as Focal Points
Fire and water features give a yard its center of gravity. They also give lighting something worth highlighting.
The strongest designs combine both elements. The Nile and Maya Linear bowls both do this, with a waterfall and a stainless steel burner, in copper.

Placement matters more than size. A feature set at the end of a sightline pulls people through the space; one tucked in a corner becomes an afterthought.
Light it deliberately:
- Uplight the bowl from the base for silhouette
- Keep the flame itself the brightest point in view
- Avoid aiming fixtures at seated eye level
For larger patios, a full fireplace anchors the space and extends usable evenings.
Conclusion: Bringing Finishes and Lighting Together
The hard part of outdoor improvement is not picking a fire bowl or a path light. It is making dozens of small choices agree with each other, and that gets much harder once construction starts.
That is the case for planning finishes and lighting together, on paper, before anything is ordered.
Bring your plans, your photos, or just an idea. Request a design consultation with Bellafina Outdoors and walk out with a material palette and a lighting plan you can hand to your contractor.
Frequently Asked Questions
How can outdoor lighting improve the look of a backyard?
Outdoor lighting does more than make a space visible after dark. Layered lighting, including ambient, task, and accent fixtures, adds depth and highlights architectural features you want to draw attention to. Low-voltage pathway lights guide guests safely, while accent lights can wash a stone wall or illuminate a fire feature. The result is a backyard that feels intentional and inviting at night, not just functional during the day.
Which outdoor finishes work best for coastal conditions?
Coastal outdoor materials need to handle salt air, moisture, and temperature swings. Powder-coated metals resist corrosion, GFRC concrete holds up without cracking, and copper develops a natural patina over time. For outdoor kitchen finishes, stainless steel and sealed natural stone are common choices. The key is matching the material to its exposure level and maintaining it as the manufacturer recommends.
What should I consider when planning a backyard lighting plan?
Start by mapping how you use the space. Identify pathways, steps, and gathering areas that need visibility, then layer in accent lighting for focal points like fire features or trees. Consider glare control so fixtures do not shine into windows or neighboring yards. A professional lighting design can help you specify the right fixtures and placements before installation begins.
How do I coordinate outdoor lighting with architectural finishes?
Choose finishes and lighting together, not separately. The color temperature of your lights affects how stone, tile, and metal surfaces appear at night. Warm light (around 2700K) tends to flatter natural stone and wood, while cooler temperatures suit modern metals. Bring samples or photos to a design consultation so you can see how finishes and fixtures work as a complete composition.