
Table of Contents
- Understanding the Work Triangle in Outdoor Kitchen Layout
- Outdoor Kitchen Zone Planning for Workflow and Function
- Outdoor Kitchen Appliance Placement Guide: Position for Efficiency
- Layout Types: Linear, L-Shape, U-Shape, and Island Configurations
- Best Outdoor Kitchen Layout for Small Spaces
- Outdoor Kitchen Counter Height Standards and Ergonomics
- Utility Requirements: Gas, Water, Electricity, and Ventilation
- Selecting Durable Materials and Finishes for Your Climate
Last Updated: August 27, 2026
Understanding the Work Triangle in Outdoor Kitchen Layout
The work triangle connects three essential zones, cooking, prep, and cleanup, and directly impacts how smoothly you move through your space. A well-designed work triangle minimizes unnecessary steps while maintaining enough distance to prevent congestion and safety hazards.
The ideal distance between any two work zones ranges from 4 to 9 feet (nkba.org). This allows one person to move comfortably between stations while accommodating a second cook without collision. Homeowners and contractors often overlook this principle, focusing on premium appliances and aesthetics without considering workflow. The result is a beautiful kitchen that's frustrating to use.
Outdoor Kitchen Zone Planning for Workflow and Function
Effective zone planning divides your space into three distinct functional areas, each with specific equipment needs and workflow requirements.
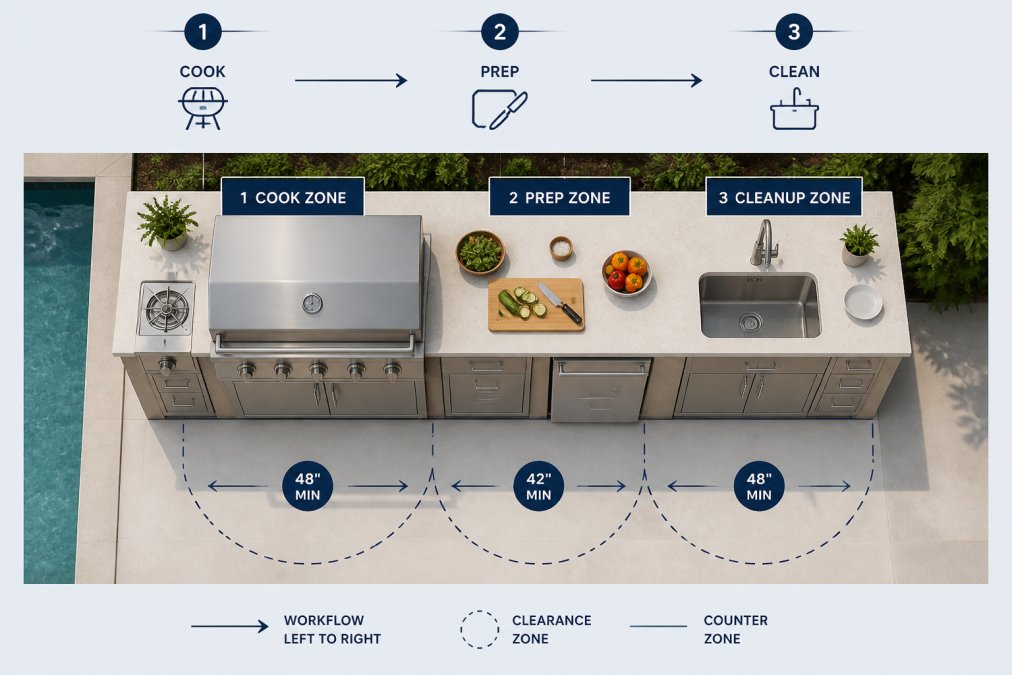
The Cooking Zone
The cooking zone centers on your primary heat source, typically a built-in grill. Position it away from high-traffic pathways with a minimum of 3 feet of clearance on the front and sides for safe operation and airflow (the CDC). If you're planning a grill with an overhead hood, ensure at least 18 inches of vertical clearance above the cooking surface.
Position your cooking zone close to prep areas, ideally within arm's reach, while keeping it separate from cleanup to avoid cross-traffic and maintain food safety. Consider the sun's path and prevailing winds; afternoon shade and strategic placement keep grilling comfortable and direct smoke away from entertaining areas.
The Prep Zone
Your prep zone needs substantial counter space, at least 24 to 36 inches of continuous workspace, and proximity to both water and storage (nkba.org). Position it adjacent to or directly across from your grill to keep prepared ingredients close to the cooking station.
Counter height should match standard kitchen heights (36 inches) unless you have specific ergonomic needs. Under-counter refrigeration or ice storage keeps ingredients accessible, and a sink positioned here supports both food preparation and cleanup without creating bottlenecks.
The Cleanup Zone
The cleanup zone centers on your sink and drainage system, positioned away from your cooking zone to prevent cross-traffic. A minimum of 24 inches of counter space on each side of the sink provides room for stacking dishes and rinsing.
Your cleanup zone requires dedicated utility connections: fresh water supply and drainage for wastewater. Position it where it's easily accessible from both your dining area and indoor kitchen. Adequate lighting above the sink is essential, especially for evening entertaining.
Outdoor Kitchen Appliance Placement Guide: Position for Efficiency
Your primary grill should anchor the cooking zone at a comfortable height, typically 36 inches from the ground to the cooking surface. Ensure it's level and stable; uneven surfaces affect cooking performance and create safety hazards.
Secondary cooking appliances like side burners should be positioned 12 to 18 inches from your main grill, allowing one cook to manage multiple dishes without crowding. Under-counter refrigeration should be positioned in or adjacent to your prep zone with adequate ventilation, typically 2 to 3 inches of clearance on sides and back.
Position your sink between your prep and cooking zones if possible, or at minimum within a few steps of your grill. Storage cabinets should surround your work zones, placing frequently used items within arm's reach.
Layout Types: Linear, L-Shape, U-Shape, and Island Configurations
Choosing the right layout depends on your available space, entertaining style, and workflow preferences.
Linear Layout
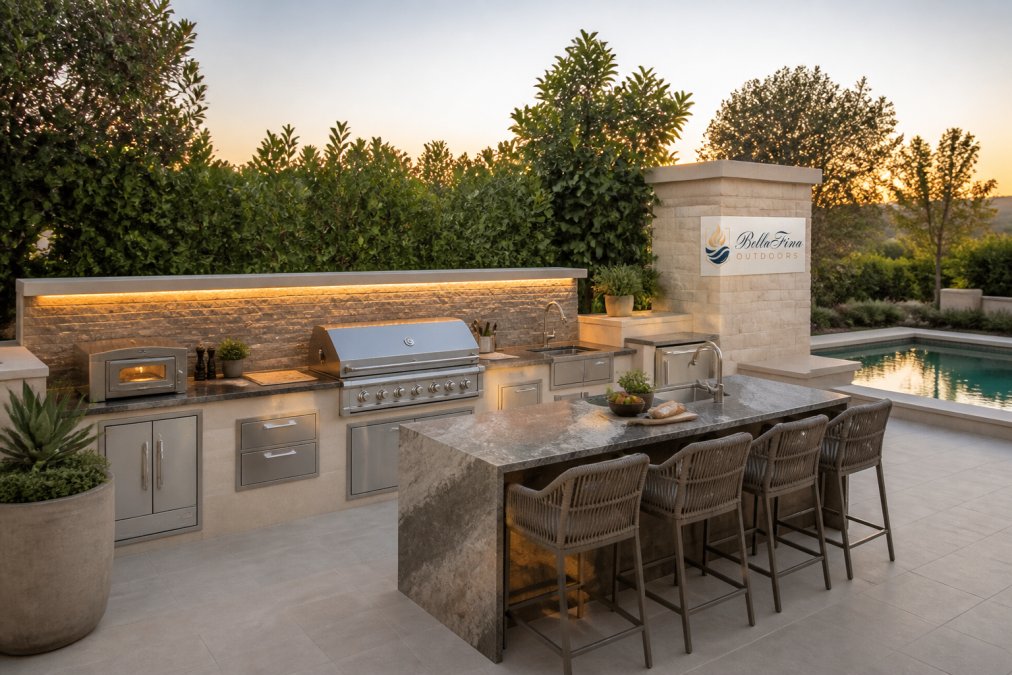
A linear layout arranges all appliances in a single straight line, working well for smaller yards or kitchens positioned along a fence or house wall. It's the most affordable to install because utility connections run in one direction. However, linear layouts create longer distances between work zones. This configuration works best for homeowners who prioritize simplicity and cost over maximum efficiency.
A linear outdoor kitchen typically spans 8 to 15 feet. Position your grill in the center of the line to minimize distance to prep and cleanup areas on either side.
L-Shape Layout
An L-shaped configuration arranges appliances along two perpendicular walls, maximizing counter space in a compact footprint while naturally separating work zones. Position your grill at the corner or along one arm, with prep and cleanup zones along the other walls.
The L-shape typically spans 10 to 16 feet in total length and works well for corner spaces or yards with defined outdoor living areas. It supports efficient workflow for one or two cooks while providing good counter space for entertaining.
U-Shape Layout
A U-shaped configuration arranges appliances along three walls, maximizing efficiency and counter space. Position your grill at the base of the U with prep areas on either side and cleanup at the opening. This arrangement minimizes walking distance between all three work zones.
The U-shape typically requires 12 to 20 feet of linear space and works well in larger backyards. It's the most expensive configuration because it requires more materials and complex utility connections, but the efficiency justifies the investment for frequent entertainers.
Island Configuration
An island places a central counter or appliance station in the middle of your outdoor space, creating a focal point for entertaining. However, islands require careful planning around utility connections and adequate clearance on all sides, at least 3 to 4 feet.
Islands work best in larger outdoor spaces (at least 20 by 20 feet). Many outdoor kitchens combine island and linear or L-shaped configurations for flexibility and visual interest while managing complexity and cost.
Best Outdoor Kitchen Layout for Small Spaces
Small outdoor spaces require strategic planning to fit all essential functions without feeling cramped. Start with a linear or L-shaped configuration rather than a U-shape or island.
Focus on essential appliances: a primary grill, a prep counter, and a sink. Skip secondary cooking appliances unless your entertaining style requires them. Use vertical space strategically with open shelving, wall-mounted storage, and overhead structures. Consider multi-functional elements like a prep counter with a built-in cutting board and sink base.
Request a Design Consultation →
In small spaces, every utility connection matters. Position your sink close to your water source and your grill near your gas line to minimize installation complexity. The best small-space outdoor kitchens succeed through intentional choices about what functions matter most.
Outdoor Kitchen Counter Height Standards and Ergonomics
Standard counter height of 36 inches matches most kitchen appliances and accommodates the average adult without excessive bending or reaching. However, ergonomics vary by individual. Taller cooks may prefer 38-inch counters; shorter cooks might prefer 34-inch counters. If multiple people regularly use your outdoor kitchen, consider varying heights: standard 36-inch work surfaces with a lower 30-32 inch prep counter or a higher 42-inch bar counter for serving.
Grill height follows the same standard: 36 inches from ground to cooking surface. Sink height should match your prep counter height for comfortable use during dishwashing and food preparation.
Bar-height counters (42 inches) work well for serving and entertaining but are uncomfortable for extended food preparation. Designing with varied counter heights ensures your outdoor kitchen remains functional and accessible for all users.
Utility Requirements: Gas, Water, Electricity, and Ventilation
Before finalizing your layout, understand the utility infrastructure required to support your appliances.
Gas connections support your grill and side burners. Natural gas requires a permanent line from your home's main supply, typically requiring a licensed plumber and permits. Propane systems offer flexibility but require regular refilling.
Water supply and drainage support your sink. Fresh water lines must be buried below the frost line to prevent freezing. Drainage lines should slope toward your greywater system or municipal connection. Most areas require permits and inspection.
Electrical connections power refrigeration, lighting, and potentially water heaters. Outdoor circuits must be GFCI-protected. Most jurisdictions require a licensed electrician and permits.
Ventilation removes smoke and cooking odors. Open-air kitchens typically don't require mechanical ventilation, but covered structures may require planning.
Before breaking ground, verify local building codes, zoning restrictions, and utility requirements with your municipality. Some areas restrict outdoor kitchen size or type, require setbacks from property lines, or mandate specific ventilation or drainage systems.
Selecting Durable Materials and Finishes for Your Climate
Material selection directly impacts your outdoor kitchen's longevity and maintenance requirements.
Stainless steel is the industry standard for outdoor appliances and countertops because it resists corrosion. Grade 304 resists rust in most climates; Grade 316 offers superior corrosion resistance in coastal areas. Coastal Orange County environments particularly benefit from Grade 316 materials due to salt air exposure.
Stone countertops, granite, marble, or engineered stone, provide durable, heat-resistant surfaces. Granite handles heat well and resists staining if properly sealed. Engineered stone offers consistency and durability. In coastal climates, ensure your stone is properly sealed to prevent salt-air damage.
Tile and backsplashes add visual interest and protect walls from splash and heat. Porcelain is more durable than ceramic and resists moisture and freezing better. Ensure grout is sealed to prevent water infiltration. Bellafina Outdoors carries a curated selection of Pool Tile, Stone and Agricultural Finishes that work beautifully in outdoor kitchen applications, offering durability and aesthetic appeal suited to Southern California's climate.
Outdoor cabinetry must resist moisture and temperature fluctuations. Stainless steel cabinets are durable but expensive. Powder-coated aluminum offers a good balance of durability and cost. Teak and other rot-resistant woods develop a natural patina but require regular maintenance.
Weatherproofing is essential regardless of material selection. Sealants, coatings, and finishes protect materials from moisture, UV damage, and temperature extremes. Regular maintenance extends your outdoor kitchen's life significantly.
In coastal environments like Orange County, salt air accelerates corrosion. Choose materials specifically rated for coastal use and plan for more frequent maintenance than inland kitchens require.
Creating a functional outdoor kitchen layout requires balancing efficiency, safety, aesthetics, and your entertaining needs. The work triangle principle, thoughtful zone planning, appropriate appliance placement, and durable materials combine to create a space you'll enjoy for years.
At Bellafina Outdoors, our outdoor living design and visualization services help you explore layout options, test workflow efficiency, and visualize your finished space before construction begins. Our team guides you through material selection, utility planning, and design decisions that transform your backyard into a sophisticated outdoor living retreat. Contact our Huntington Beach design center to discuss your outdoor kitchen project and explore the premium products and expert guidance that make your vision a reality.
Frequently Asked Questions
Q: What is the work triangle in outdoor kitchen layout design?
A: The work triangle connects three essential zones: the grill (cooking), prep counter, and sink (cleanup). Ideally, the distance between each point should be 4-9 feet, and the total perimeter should not exceed 26 feet. This spacing minimizes steps during meal preparation and cooking, reducing fatigue and improving workflow efficiency in your outdoor kitchen layout.
Q: What are the best outdoor kitchen zone planning strategies for entertaining?
A: Separate your cooking zone from the entertaining space so heat and smoke don't affect guests. Position the grill station away from seating areas, keep prep zones behind or to the side of the cooking area, and create a cleanup zone with a sink and trash disposal that doesn't interrupt the flow. This outdoor kitchen zone planning approach keeps your guests comfortable while you cook.
Q: What counter height standards should I follow for outdoor kitchen design?
A: Standard outdoor kitchen counter height is 36 inches for prep and cleanup areas, matching indoor kitchen standards. Grill countertops are typically 42 inches to accommodate the grill height and reduce bending. For accessibility, consider varying heights: some 30-inch sections for seated prep work, and ensure clearance zones of at least 24 inches in front of appliances for comfortable operation.
Q: How can I fit a functional outdoor kitchen in a small backyard?
A: Choose a linear or L-shape layout instead of U-shape to save space. Opt for compact built-in appliances, a single-burner grill, and a small under-counter refrigerator. Mount shelving vertically for storage, and position your kitchen at the edge of the patio to maximize entertaining space. The best outdoor kitchen layout for small spaces prioritizes essential zones while leaving room for seating and entertaining.
This article was written using GrandRanker